

*EDITOR’S NOTE: This is just for the retractable impact screen. The price reflected does not include your simulator, mat, software, etc. This is just how to build a retractable screen on a budget.*
While home golf simulator setups continue to get more affordable, at least the devices do, finding a decent solution to hit into can vary wildly, ranging from less than $100 for simply a net to hit into, or thousands of dollars for permanent setups, or even more for retractable ones on a motor.
If you are cramped for space, or just don’t want to have your impact screen up at all times, a retractable screen is the way to go. It rolls up or down in seconds, and when not in use, it out of the way so you have full functionality of your garage or whatever room that you want to have your simulator setup in. The big problem that I mentioned earlier: A retractable golf sim is insanely expensive to have one made for you.
This package from Square Golf on the Indoor Golf Shop STARTS at $2700 for the smallest one they make.
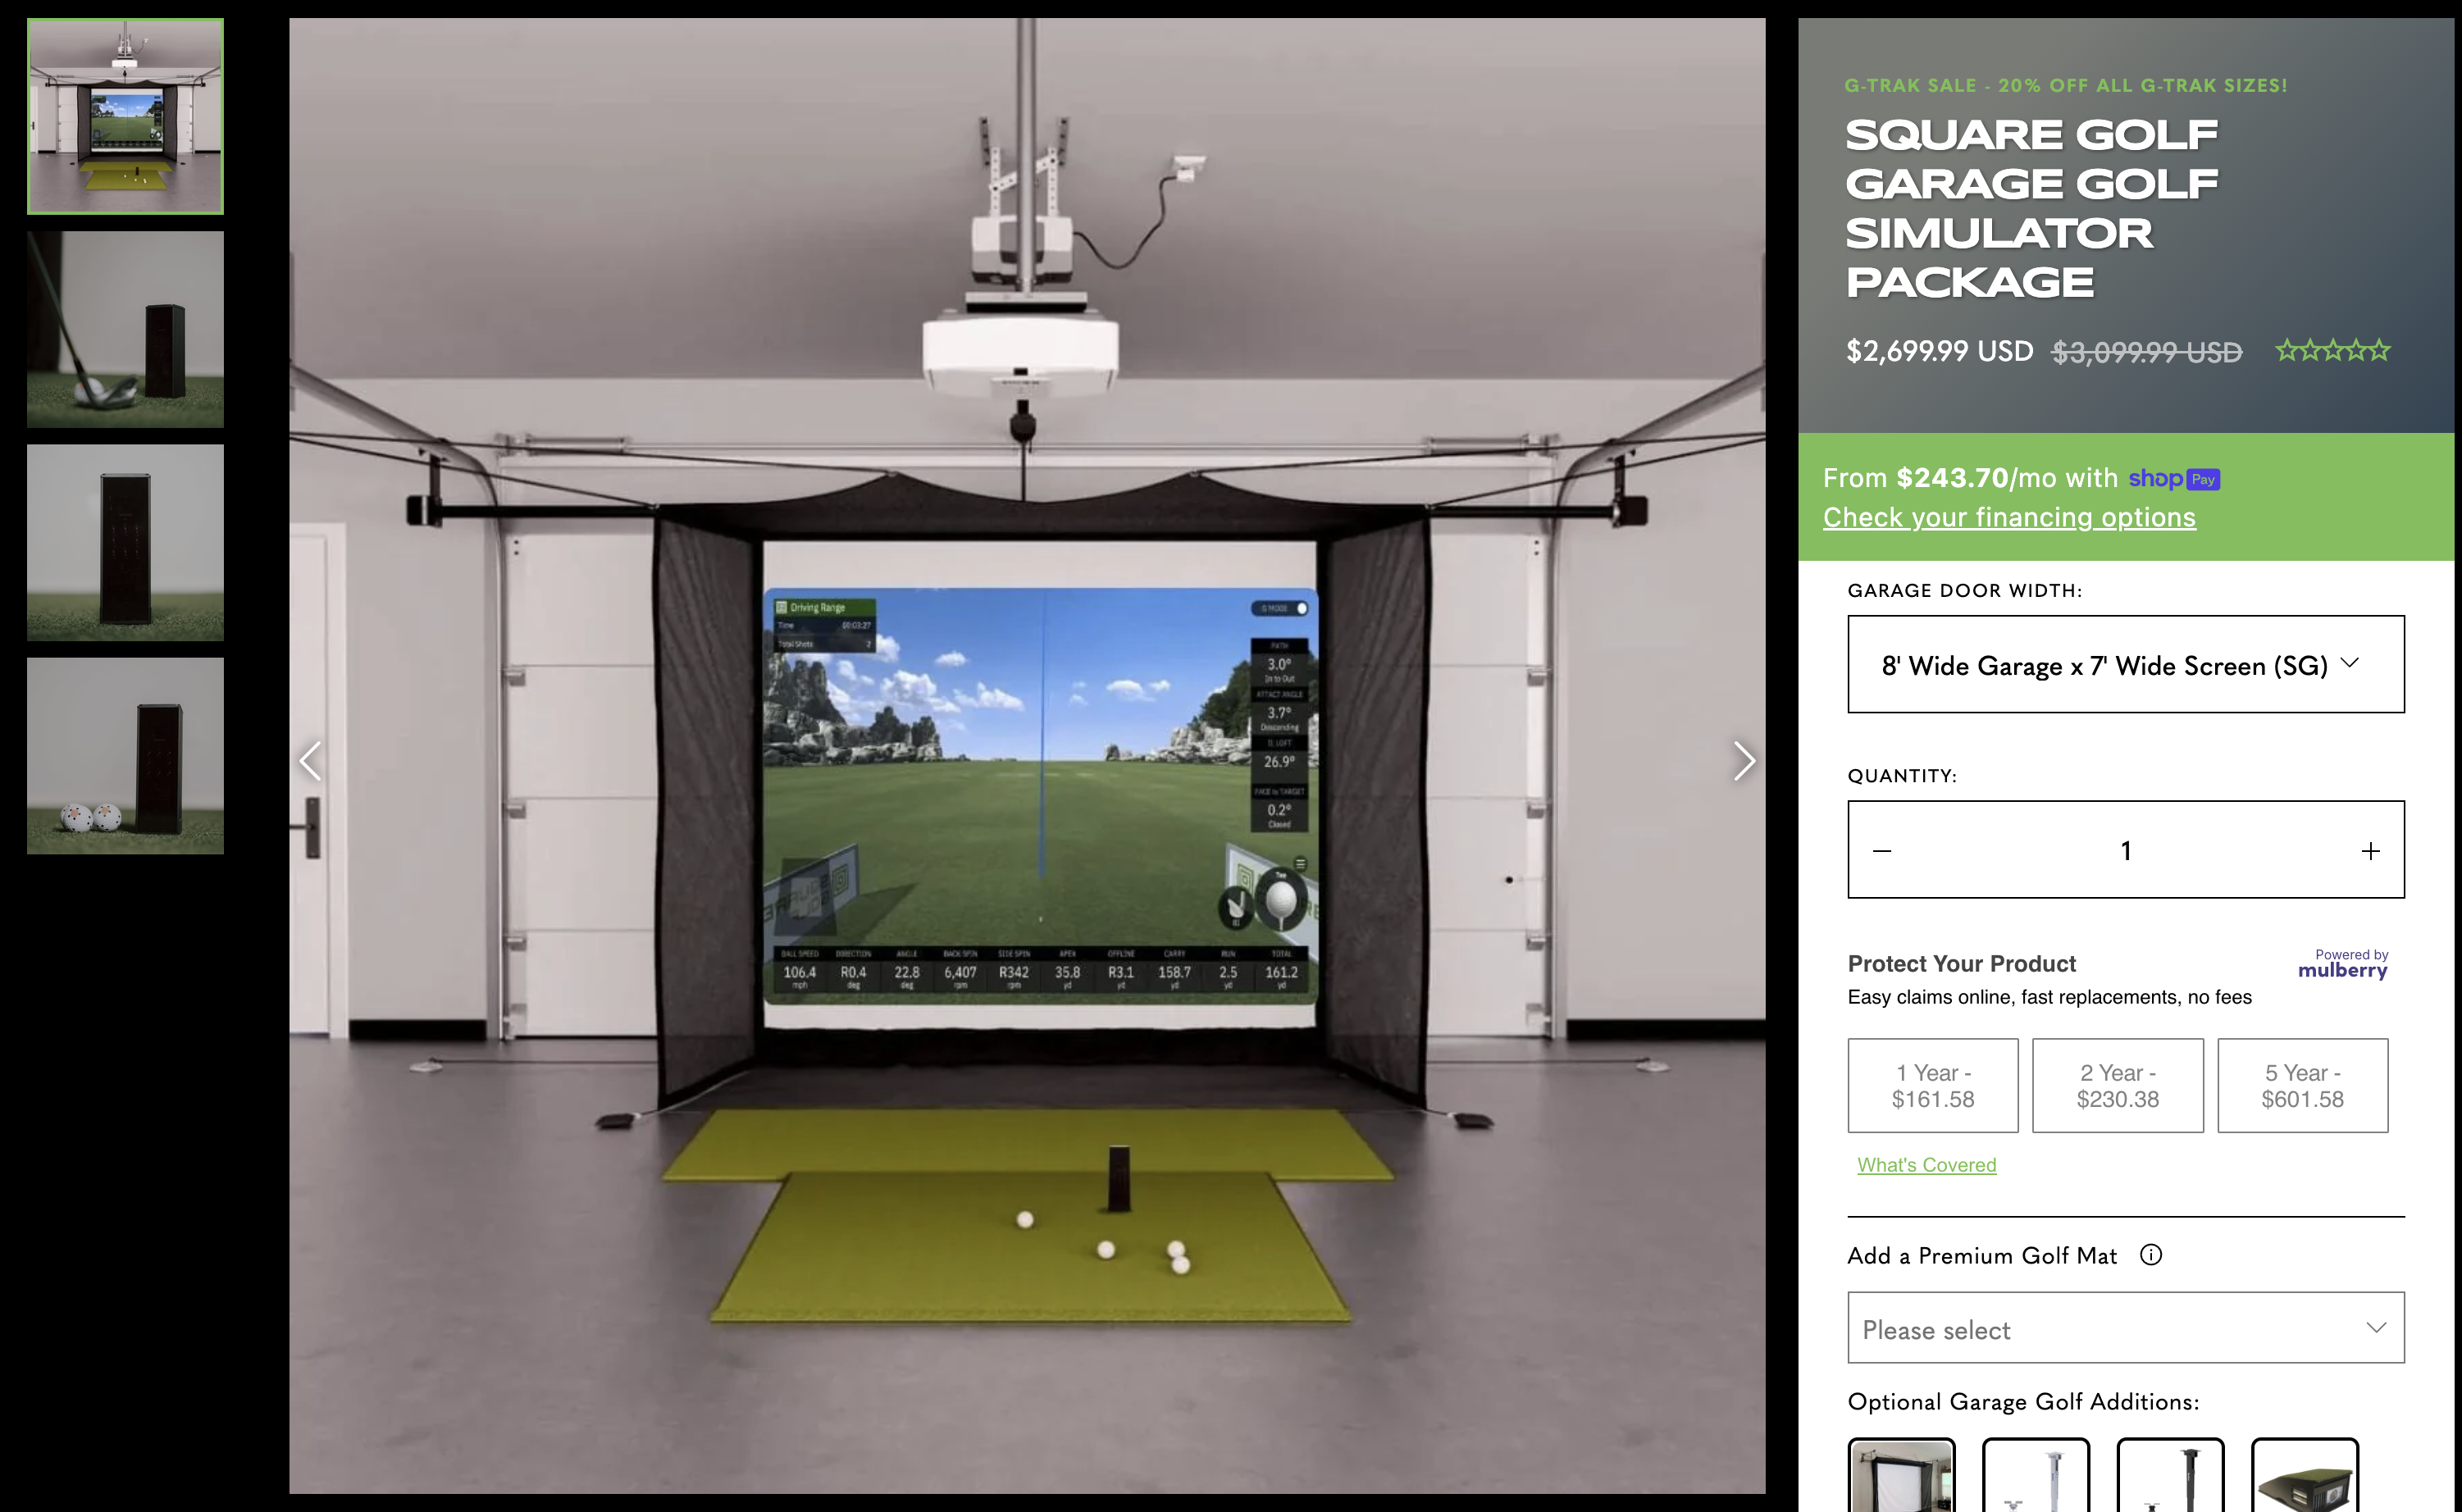
This one from G-Trak is $1600, again, for the smallest one they make. And the reviews on products like this are very hit or miss.

Needless to say, dropping over $1600+ is not easy for most people to do, and if the quality isn’t super great, there has to be a better way without worry that you dropped a mortgage payment (or two) on building a retractable golf simulator screen that you may not be totally happy with.
This is where I come in to help, with a budget solution that through a couple weekends, has held up well, been easy to use, and helped make more space in our garage at home. All told you, you can do this for around $250, maybe more, maybe less, mainly depending on the size of the screen you want to buy for your space.
All you need is four items and just a smidge of handyman skills.
My purchases, and prices, (with links to help, I do not get a commission or anything like that, just trying to help you with exactly what I bought) for this project were as follows:
Coala Hola Impact Screen, 9.8′ x 9.8′ – $160
Fotoconic Photography Backdrop Roll – $39
2-Inch Wood Screws – $8
10′ PVC Pipe, 2″ Diamter – $14.36
Total spent: $222 before tax.
*NOTE: With that photo roller, you will need a 2″ diamater PVC pipe. I bought 1.5″ on the first trip to Lowe’s and had to go back.*
From there, what you will need to do is locate the studs in your garage or room, and find out how far apart they are. I lucked out in that I wanted to build a roughly 10′ x 10′ space, and the studs in my garage ceiling ended up at an interval where there were two exactly 10′ apart. If you want to do bigger, you can, but would likely need two pieces of PVC pipe, and then a coupling to make it 12′ or 14′ or whatever size you want.
Here is the step-by-step on how to install your roller and screen:
- Mount the the metal brackets included with the photo backdrop roller into the ceiling, drilling the screws into the studs.
- Put the roller pieces into each end of your PVC pipe, and rotate until snug.
- Lift PVC pipe and place metal rod on roller pieces into the J-hook part of the metal brackets hanging from your ceiling.
- Starting at one corner, uses ball bungees included with screen, and begin attaching until all 11 grommets across the top are attached to your PVC pipe.
- Attach the chain and weight included with the photo backdrop roller and make sure your rollers are in tight enough, test to make sure it raises and lowers.
That’s it. That is literally it. The whole thing took me may be 30 minutes to build (minus the return trip to Lowe’s), and I would not at all describe myself as a handy man. And as you can see in this video below, voila, it works like a charm, and you can see how much bigger it is, and how much less space it takes up when not in use, than my previous homemade setup.
And here it is with my SkyTrak plus, my mat, my extra turf, and a shank net on the side, with my projector filling up the screen.
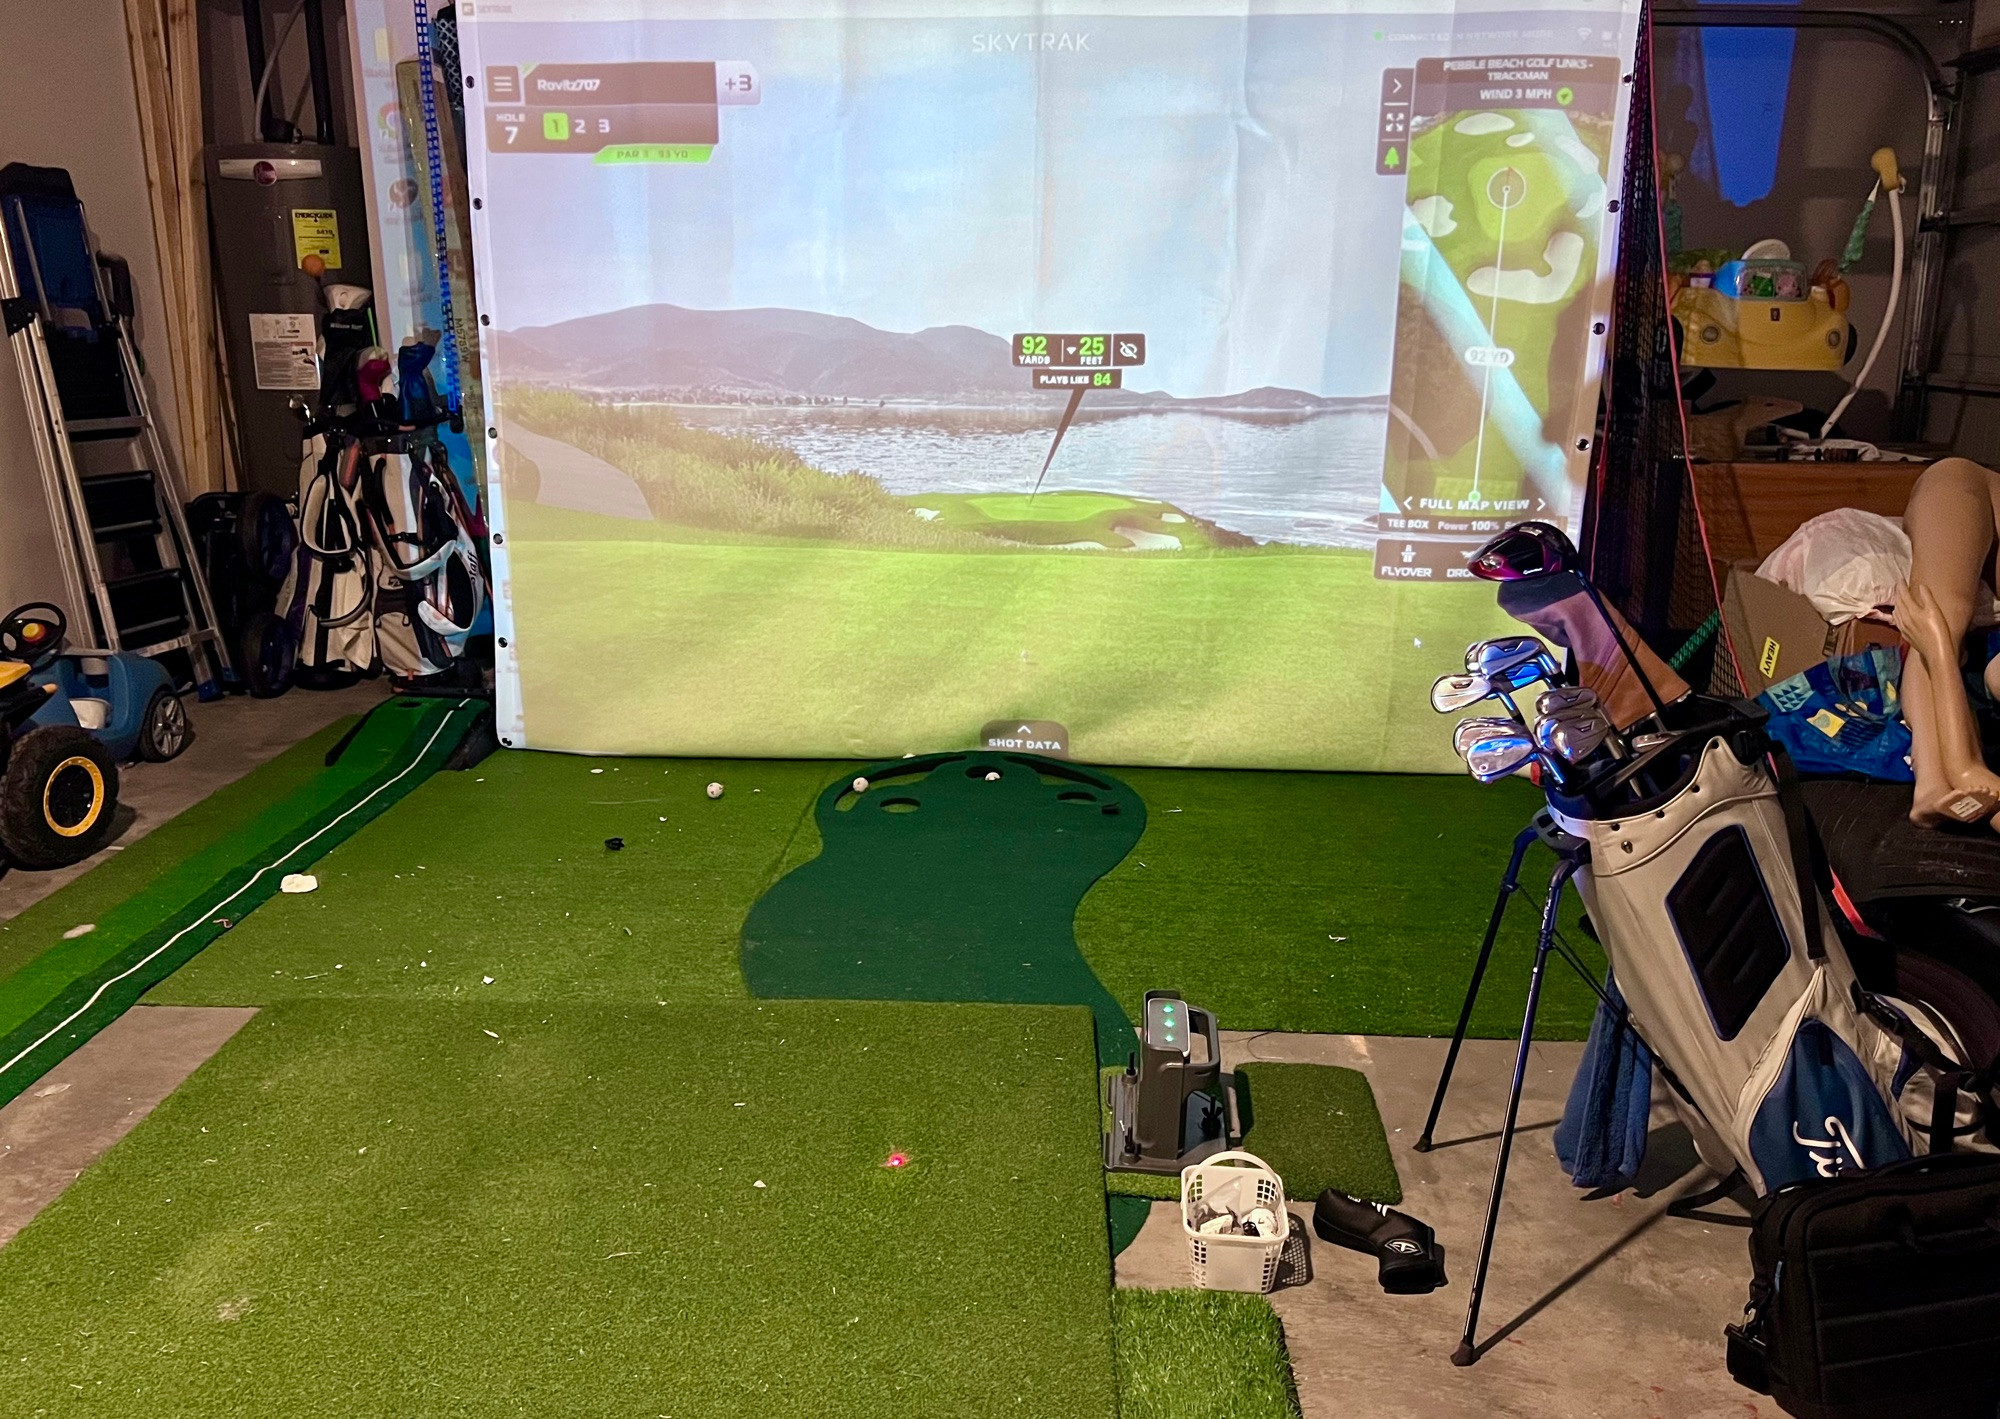
Now, is everything perfect with it? Not quite. As you can see in the above picture, the bottom of the screen has a little bit of slack to it, and I am still figuring out the best solution to keep the bottom tight to not allow balls to pass under it, and also so the screen doesn’t need readjusting every handful of hits.
But. For $222, roughly 1/8th of the price of the cheapest retractable unit I could find online, I’m not expecting perfect. I just want a way to easily have a golf sim screen in my garage, that I can put away when I’m not using it, and not have to drop an arm and a leg on it. And I think I’ve accomplished that, and think it will only get better as I figure out a way to secure the bottom a little more, and add a second shank net to the left side so our kid’s errant shots don’t roll behind it.
So there you go, if you want to take down Big Golf Simulator and not spend thousands of dollars to have a custom setup in your garage, here’s proof that anyone can do it.
*Just for full total in case you are starting from scratch, to get this setup, I have the SkyTrak+, the GoSports 5×5 hitting mat, just whatever 6’x’12’ turf from Amazon, and the GoSports shank net. All in total is in the neighborhood of $2500 for this setup.*
